Create a variation site in SharePoint 2010
Follow these steps to create a variation enabled site collection.
Step 1:
Install language packs for SharePoint ,you can download the language packs by click here
NOTE: for windows 7 users follow these additional steps to set up Language packs
Step2:
Create the Variation Source site
This is the site collection which is going to hold the variation (sub) sites.
Step3:
Go to
Site Action - >
Site settings- > Under
Site Collection Administration - >
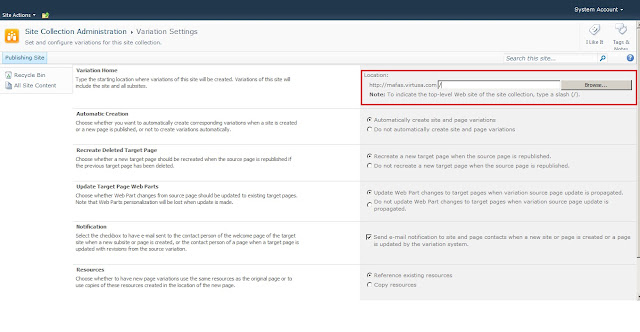
Variation
Set the variation Home (
Starting location where variations of this site will be
created. Variations of this site will include the site and all subsites)
 Step 4:
Go to
Site Action - >
Site settings- > Under
Site Collection Administration - >
Variation Labels - >
New Label
In here you have to create the variation labels (e.g. En-US,Fr-FR)
Tick the "
Set this variation to be the source variation" check box if you want to set this as a source variation site.
Source site is the site which will propagate any contents to the target sites.
Repeat step 4 to create any amount of target labels.
Note: You can create only one source label.
Step 5:
Go to
Site Action - >
Site settings- > Under
Site Collection Administration - >
Variation Labels - >
press Create Hierarchies
Press OK
Step 6:
Go to
Central Administration click on
Monitoring tab - >Under
Timer jobs click
Review job definitions
Select the
Variation create hierarchy job definition
Press
Run Now

If variation site is successfully created Hierarchy created column will be indicate as
Yes

 Step 4:


 Step 3.
 Step 4.


 2.Go the the site you wish to restore this List